Android is a major Operating system that took the smartphone, and Tablet market by storm. There have been companies that have had greater sales or a more loyal customer base than Android. However, there has been no brand up to date that has risen to the top in such a short span of time, blasting the competition to smithereens. Yes, Android is truly a winner in this sector, being the only company to conquer such a huge area in the market within a couple of years since its inception.
Some of the major operating systems that fell prey to the lethal Android Axe were Symbian and Bada. Even iOS, the previously invincible-like Operating System took some major hits. One of the companies that landed squarely on its face was Nokia.
Nokia was a company with a customer base that, at one time, appeared to be ever loyal. Excepting the elite who chose for a more efficient Apple, most users belonged to the Nokia family. This era ended drastically after the entrance of Android. Now, even as we speak, users are switching from Nokia phones to an Android-powered phone such as the ones manufactured by Samsung, HTC, Sony etc. Thus, for all the Nokia users out there who are looking to switch to the ever-developing Droid, we present an easy guide to transferring contacts from your Nokia phone to an Android Smartphone. The procedure for the same is:
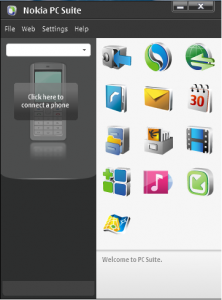
Step 1: Connect your Nokia device to the computer using the USB cable that is provided along with the device at the time of purchase. Go to the Nokia PC suite and select your contacts from the dashboard.


Step 2: Now, when you get a list of contacts, select all of them and click on ‘File’. From the pop-up menu that appears, select ‘Export’. Now, choose an appropriate destination to copy the contacts or copy them to the desktop. The contacts have to be saved in CSV format.

Step 3: Now, disconnect your Nokia device and connect your Android Phone to the Computer. The next step is to open ‘Kies’. Please note, that at the time of opening Kies, you might come across an MTP error. Do not worry about it, you can easily fix the error by taking a look at certain online tutorials.
Step 4: After you have overcome the issue of the MTP error, you have to open ‘Kies’. Once you have Kies opened, click on the ‘Contacts’ icon. You will be redirected to a new page where you have to select the option ‘Open File’.
Step 5: After you click on Open file, you will get a list. Select the CVS list that you had saved from Nokia PC Suite.

Step 6: After this, you will be asked to map fields. Mapping fields is basically corresponding to the same fields. For example ‘Work Number’ with ‘Work Number’. If you are unsure about how to do this, leave it for the moment.
And voila! Once you have done this, you have all your precious contacts safely in the Droid. Do take a backup though, Android isn’t as safeguarded as you think it is!
This post was last modified on March 28, 2020 9:12 AM